
 KonfAI
Synthesis Example#
This example shows how to run a complete medical image synthesis workflow with KonfAI in its low-level, YAML-driven mode.

It is the best starting point if you want to understand how KonfAI combines:
configuration files
local custom Python modules
training
prediction
evaluation
The default workflow is built around MR to CT synthesis, but the same structure can be adapted to CBCT to CT or other paired image-to-image tasks.
What you will find in this folder#
examples/Synthesis/
├── Config.yml
├── Config_GAN.yml
├── Prediction.yml
├── Evaluation.yml
├── Model.py
├── UNetpp.yml
├── README.md
├── Synthesis_demo.ipynb
└── UnNormalize.py
Config.yml: training workflowConfig_GAN.yml: GAN training workflow with a 2D generator and a 3D discriminatorPrediction.yml: shared inference workflow for both the baseline checkpoint and the generator extracted from a GAN checkpointEvaluation.yml: shared evaluation workflow for both synthesis variantsModel.py: local model module defining the baselineUNetpp5, theDiscriminator, and the fullGanUNetpp.yml: the baselineUNetpp5generator as a declarative YAML (weight-identical)UnNormalize.py: example of a local custom postprocessing transform
Two ways to define the model#
The baseline generator ships in both forms, like the Segmentation UNet — swap the
classpath in Config.yml, they are weight-identical and both expose the Head:Tanh output:
Model:
  classpath: Model:UNetpp5  # Python form (Model.py)
  # classpath: UNetpp.yml   # declarative form — the same smp UNet++ + Tanh, node-for-node
UNetpp5 wraps segmentation_models_pytorch.UnetPlusPlus (a ResNet-34-encoder UNet++, ~117
conv layers) with a Tanh head, so UNetpp.yml is large — it shows that even an
encoder-backed model can be fully declarative. In practice classpath: segmentation.smp.SMP
(with arch/encoder_name as parameters) is the compact way to declare the smp backbone.
The GAN (Config_GAN.yml) stays Python: Gan composes a generator and a discriminator
with a bespoke adversarial forward, which a feed-forward graph cannot express. Rule of thumb:
feed-forward graph → YAML; custom forward / multi-network training loop → Python.
Recommended way to start#
If you only want to get KonfAI running once and understand the folder structure:
download the demo dataset
run training
run prediction on the same dataset
run evaluation
inspect
Checkpoints/,Predictions/, andEvaluations/
If you prefer a guided walkthrough, open:
Synthesis_demo.ipynb
The notebook is designed to work from a fresh environment, including Google Colab. Its first setup cells can:
clone the KonfAI repository if needed
install KonfAI and its Python dependencies
download the public demo subset automatically
Demo dataset#
The public demo dataset is hosted on Hugging Face:
https://huggingface.co/datasets/VBoussot/konfai-demo
If you want a notebook-driven first run, use Synthesis_demo.ipynb.
If you prefer to fetch the demo subset manually, use the Hugging Face CLI:
python -m pip install -U "huggingface_hub[cli]"
hf download VBoussot/konfai-demo \
  --repo-type dataset \
  --include "Synthesis/**" \
  --local-dir Dataset
mv Dataset/Synthesis/* Dataset/
rmdir Dataset/Synthesis
rm -rf Dataset/.cache
After that, your local layout should look like:
examples/Synthesis/
├── Dataset/
│   ├── CASE_001/
│   │   ├── MR.mha
│   │   ├── CT.mha
│   │   └── MASK.mha
│   └── ...
├── Config.yml
├── Config_GAN.yml
├── Prediction.yml
├── Evaluation.yml
├── Model.py
└── UnNormalize.py
Dataset groups used by the example:
MR: model inputCT: ground-truth targetMASK: mask used for preprocessing and masked evaluation
Quick start#
Run all commands from this directory:
cd examples/Synthesis
For the smoothest first run on a fresh machine or in Colab, start with Synthesis_demo.ipynb.
1. Train#
konfai TRAIN -y --gpu 0 --config Config.yml
If you do not have a GPU available, use --cpu 1 instead of --gpu 0.
This creates:
Checkpoints/TRAIN_01/Statistics/TRAIN_01/
2. Predict#
Use one checkpoint from Checkpoints/TRAIN_01/:
konfai PREDICTION -y --gpu 0 --config Prediction.yml --models Checkpoints/TRAIN_01/<checkpoint>.pt
This creates:
Predictions/TRAIN_01/
3. Evaluate#
konfai EVALUATION -y --config Evaluation.yml
This creates:
Evaluations/TRAIN_01/
GAN variant#
This folder also contains a second synthesis variant:
Config_GAN.ymlModel.py
The GAN example is useful if you want to understand a more advanced KonfAI pattern:
a 2D / 2.5D generator
a 3D discriminator
two different patching levels in the same model graph
shared prediction and evaluation workflows with the baseline model
Both training variants use the same local UNetpp5 definition from Model.py:
Config.ymltrainsModel:UNetpp5directlyConfig_GAN.ymltrainsModel:Gan, which internally contains the sameUNetpp5generator plus a 3D discriminator
Because the generator class name stays UNetpp5 in both cases, the same Prediction.yml can reload either:
a baseline checkpoint from
TRAIN_01or the generator weights saved inside a GAN checkpoint from
TRAIN_GAN_01
Why there are two patch definitions#
In Config_GAN.yml, there are two different patching scopes:
Dataset.Patch: the global 3D patch given to the whole GANModel.Gan.UNetpp5.Patch: the internal generator patch
The idea is:
the full GAN sees a 3D chunk, so the discriminator can judge local 3D realism
inside that 3D chunk, the generator still works slice-wise with 2.5D context
In practice:
the dataset patch extracts a chunk like
[16, 320, 320]the generator patch reprocesses that chunk as
[1, 320, 320]withextend_slice: 4this gives the generator a 2D prediction target with neighboring slices as context
What ;accu; means here#
The ;accu; marker refers to the patch-wise outputs before re-assembly.
That matters in the GAN example:
Generator_A_to_B:;accu;Head:Tanhis used for the generator reconstruction lossDiscriminator_pB:Head:Convis used after the generator output has been re-assembled as a 3D chunk
So the flow is:
the generator predicts slice-wise patches
KonfAI accumulates and re-assembles them into a 3D chunk
the 3D discriminator receives that assembled fake chunk
This is the key semantic difference between the baseline and the GAN variant.
GAN commands#
Train the GAN variant:
konfai TRAIN -y --gpu 0 --config Config_GAN.yml
Predict from the generator weights saved inside the GAN checkpoint with the shared prediction workflow:
Before running prediction, set train_name in Prediction.yml to TRAIN_GAN_01 so the outputs are written to the right folder.
konfai PREDICTION -y --gpu 0 --config Prediction.yml --models Checkpoints/TRAIN_GAN_01/<checkpoint>.pt
Then evaluate the GAN predictions with the shared evaluation workflow:
Before running evaluation, update Evaluation.yml so both train_name and the prediction folder point to TRAIN_GAN_01.
konfai EVALUATION -y --config Evaluation.yml
Pretrained models#
If you want to test inference without training from scratch, you can use pretrained models from:
https://huggingface.co/VBoussot/Synthrad2025https://huggingface.co/VBoussot/ImpactSynth
The Synthrad2025 repository contains challenge checkpoints that can be used as examples of ensemble prediction.
What this example demonstrates#
This example is useful because it shows several important KonfAI patterns in one place:
a custom model loaded through
classpatha custom postprocessing transform
patch-based training and prediction
a GAN variant with nested patching scopes
shared prediction and evaluation across baseline and GAN checkpoints
patch-wise outputs exposed through
;accu;masked evaluation
train / prediction / evaluation split across dedicated YAML files
What to adapt for your own project#
The first fields you will usually change are:
dataset_filenamesinput and target groups
preprocessing transforms
patch size
batch size
model class and model hyperparameters
losses and monitored metrics
train_name
Notes#
This example is intended for workflow understanding and experimentation.
If you want a simpler user-facing interface for a mature workflow, the next step is usually to package it as a KonfAI App.
For a ready-to-use synthesis app, see
apps/impact_synth.
See synthesis on real medical images#
The low-level configurations above are learning templates. The cards below are
from a separate, completed ImpactSynth App run on de-identified SynthRAD
2025 Task 1 abdomen case 1ABB124 (CC BY-NC 4.0). Five checkpoints evaluated
the original MR and two test-time augmentations, producing 15 inference states.
All text and measurements remain in HTML; the PNG files contain medical pixels
only. Full attribution and hashes are in the
asset provenance manifest.
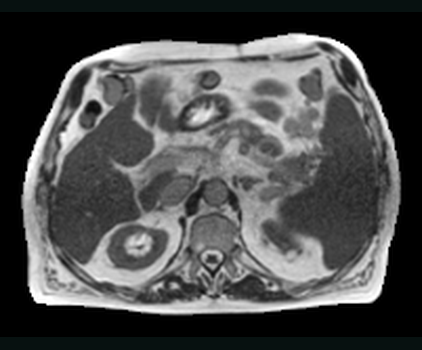
01 · REAL APP INPUTMR inputOne extracted plane from the paired abdominal case.Z +18 MM · 2 MM GRID 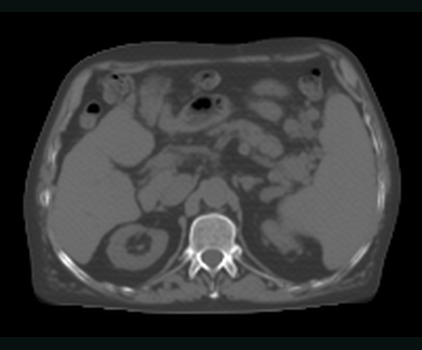
02 · REAL APP OUTPUTImpactSynth sCTFive checkpoints over the original MR and two TTA states.15 INFERENCE STATES 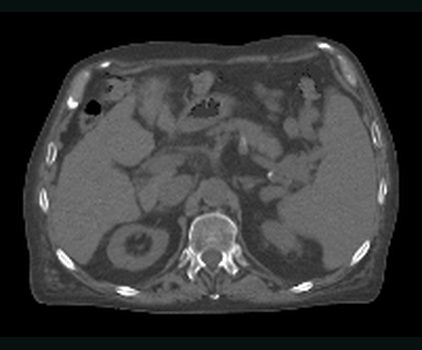
03 · REAL REFERENCEPaired CTThe real target remains separate from the generated image.SAME PHYSICAL PLANE · 2 MM GRID 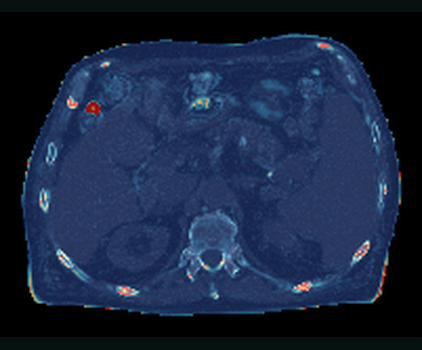
04 · APP EVALUATIONAbsolute-error mapDisplay range 0–438.20 HU (P99); case scores use the complete metric volume.MAE 22.94 HU · PSNR 34.16 DB · SSIM 0.913 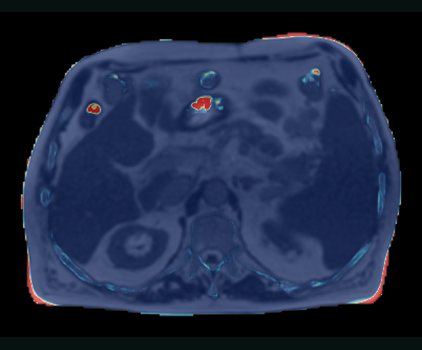
05 · APP UNCERTAINTYEnsemble uncertaintyDisplay range 0–4520.81% of baseline (P99) across all 15 states.MEAN 109.61% BASELINE · DISAGREEMENT 0.016
One real case through prediction, evaluation, and uncertainty.MR → 15-state sCT → paired CT comparison · all outputs retain physical geometry
See Using KonfAI Apps for the reproducibility snapshot and the downstream TotalSegmentator and Slicer workflow.
In the docs#
Docs notes. UnNormalize.py contains a local transform used during
prediction. The two GAN patch scopes correspond to the full config paths
Trainer.Dataset.Patch (the global 3D chunk seen by the GAN) and
Trainer.Model.Gan.UNetpp5.Patch (the internal 2D/2.5D slices seen by the
generator). When adapting the example, also change the local model
definitions in Model.py if the built-in modules are not enough.
Next steps:
Model graph and output naming — how routed module graphs like the one in
Model.pyare composedUsing custom models, transforms, augmentations, and losses — to write and reference your own modules through
classpathTraining configuration — reference for the training-side configuration keys