
 KonfAI
Segmentation Example#
This example provides a simple multiclass segmentation baseline for KonfAI.

It is intentionally conservative and is meant to be:
easy to read
easy to adapt
easy to use as a first segmentation template
The current baseline uses:
the routed KonfAI model graph declared in
UNet.ymla 2D slice-wise setup
patch-based training
CrossEntropyLossduring trainingDice evaluation after prediction
41classes in total (0for background,1..40for labels)
What you will find in this folder#
examples/Segmentation/
├── Config.yml
├── UNet.yml
├── Model.py
├── Prediction.yml
├── Evaluation.yml
├── README.md
└── Segmentation_demo.ipynb
Config.yml: training workflowUNet.yml: UNet modules, nested skip connections, parameters, and routingModel.py: the same UNet written as a Python classPrediction.yml: inference workflowEvaluation.yml: evaluation workflowSegmentation_demo.ipynb: guided onboarding notebook
Two ways to define the model#
KonfAI accepts a model as a declarative YAML graph or as a Python class, and this
example ships both — they build the same network, so they are interchangeable. Pick one in
Config.yml/Prediction.yml:
Model:
  classpath: UNet.yml      # declarative form (this is the default here)
  # classpath: Model:UNet  # the Python form in Model.py — same architecture
Use the YAML form for a no-code, shareable model (safe by construction — it can only
reference a curated set of block types). Reach for the Python form when a model needs a
custom forward or logic a declarative graph cannot express (the Synthesis example is such a
case). Because both expose the same named output UNetBlock_0:Head, outputs_criterions in
Config.yml is unchanged when you swap between them.
The notebook is designed to work from a fresh environment, including Google Colab. Its setup cells can:
clone the KonfAI repository if needed
install KonfAI and its Python dependencies
download the public segmentation demo subset automatically
Expected dataset layout#
Dataset/
├── CASE_000/
│   ├── CT.mha
│   └── SEG.mha
├── CASE_001/
│   ├── CT.mha
│   └── SEG.mha
└── ...
CT: input imageSEG: segmentation label map
The default template assumes:
a multiclass task
label
0as backgroundlabels
1..40as foreground classesone input image per case
SEGstored as a label map with integer values
Demo data#
The public Hugging Face demo dataset is available at:
https://huggingface.co/datasets/VBoussot/konfai-demo
If you want the easiest first run, use Segmentation_demo.ipynb.
If you prefer to fetch the demo subset manually, use the Hugging Face CLI:
python -m pip install -U "huggingface_hub[cli]"
hf download VBoussot/konfai-demo \
  --repo-type dataset \
  --include "Segmentation/**" \
  --local-dir Dataset
mv Dataset/Segmentation/* Dataset/
rmdir Dataset/Segmentation
rm -rf Dataset/.cache
After that, your local Dataset/ folder should already match the structure expected by this example.
Quick start#
Run all commands from this directory:
cd examples/Segmentation
Once your Dataset/ folder is ready:
For the smoothest first run on a fresh machine or in Colab, start with Segmentation_demo.ipynb.
1. Train#
konfai TRAIN -y --gpu 0 --config Config.yml
2. Predict#
konfai PREDICTION -y --gpu 0 --config Prediction.yml --models Checkpoints/SEG_BASELINE/<checkpoint>.pt
3. Evaluate#
konfai EVALUATION -y --config Evaluation.yml
This produces:
Checkpoints/SEG_BASELINE/Predictions/SEG_BASELINE/Evaluations/SEG_BASELINE/
What to adapt first#
For a real project, you will usually want to update:
dataset_filenamestrain_namepatch size
batch size
number of classes
preprocessing transforms
Dice labels in
Evaluation.ymlmodel channels and scheduler
For multiclass segmentation:
update
nb_classupdate
Dice.labelsreview the label encoding in your dataset
Why training uses CrossEntropyLoss here#
This example uses CrossEntropyLoss during training and Dice during evaluation on purpose:
training stays simple and stable
the final segmentation quality is still measured with Dice
This makes the example easier to understand and monitor before moving to more advanced losses.
Recommended usage#
Use this example when you want to:
bootstrap a new segmentation experiment quickly
understand the minimal KonfAI structure for segmentation
create your own YAML template before moving to stronger architectures or 3D workflows
If you want the easiest first run, start with:
Segmentation_demo.ipynb
See segmentation on a real App output#
The tutorial above teaches the low-level SEG_BASELINE workflow; it does not
ship a trained checkpoint or claim the result below. These two cards instead
show a separate, completed TotalSegmentator KonfAI App execution on the real
synthetic CT produced by ImpactSynth. They illustrate the path from a mature
segmentation model to a medical label map without pretending it is the expected
output of the small 41-class tutorial UNet.
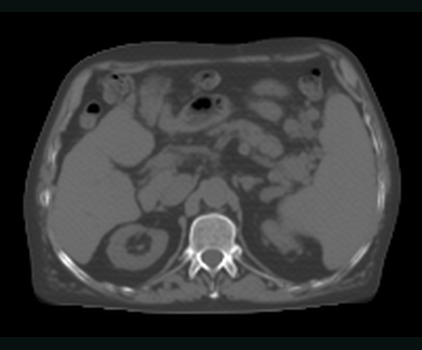
SEPARATE APP INPUTImpactSynth sCTThe downstream segmentation App receives a medical CT volume on the 2 mm reference grid.REAL APP ARTIFACT · 2 MM GRID 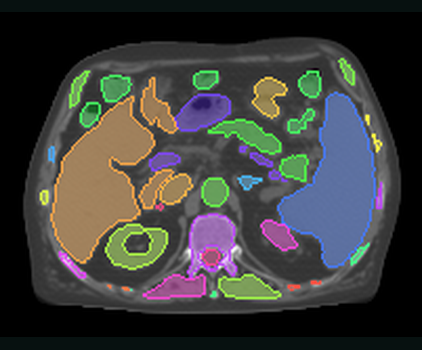
SEPARATE APP OUTPUTTotal anatomy label mapThe full five-model ensemble materialises anatomical labels on the input geometry.FULL TOTAL OVERLAY · 5 MODELS
Real App evidence, not a fabricated tutorial result.ImpactSynth sCT → five-model TotalSegmentator → medical label-map dataset
A separate one-checkpoint total-3mm evaluation branch scored Dice 0.665 on
this case. That number does not score the five-model total overlay displayed
above. The source is de-identified SynthRAD 2025 Task 1 abdomen case 1ABB124
(CC BY-NC 4.0); see the
asset provenance manifest.
See Using KonfAI Apps for the completed App workflow and KonfAI on real data for the real transform, augmentation, and registration evidence.
In the docs#
Docs notes. Training also writes TensorBoard statistics to
Statistics/SEG_BASELINE/ alongside the checkpoint, prediction, and
evaluation folders. UNet.yml defines the routed KonfAI UNet graph through
add_module metadata. The class count is set by the nb_class config key:
if your dataset is not a 0..40 label map, update both nb_class and the
Dice labels together.
Next steps:
Quickstart — a minimal first end-to-end run outside the examples
Training configuration — reference for the training-side configuration keys